Partners can use their Partner Portal to submit and monitor requests, using a unique URL and login information provided by use. This article explains your configuration and setup process for the Enhanced Version of the Partner Portal. The Enhanced version, as opposed to the Basic Version, of the portal allows your partners to see more information about current and past requests, to make additional purchases based on how you have setup your price groups for that partner, and to make payments if you have payment processing enabled.
View the help article for the Basic Portal version for more information on Basic Portal usage.
There is a separate help document geared to your Enhanced Partner Portal Users available from within their portal.
There are a few steps that are involved with setting up your partners with portal access. You will need to add your partners and configure and enable their access, grant access to forms (if any), set which data entry fields your partners may, and optionally must, enter for a service request, set any messages you would like to appear on the Partner's Dashboard, and configure Price Groups including the optional ability to select additional items and/or services.
Partner Portal Access Settings
You maintain your list of Partners via Admin > Associated Facilities Maintenance > Maintain Associated Facilities. See the Maintain Associated Facilities help article for more information. You will designate the associated facility as a partner by checking the Reception and/or Trade Customer checkbox.
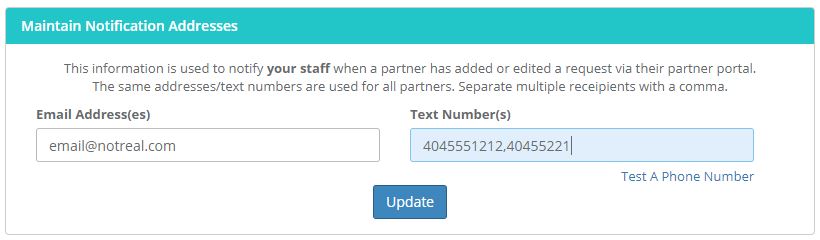
Once you have your partner setup you will need to grant them Portal Access via Admin > Associated Facilities Maintenance > Partner Portal > Partner Portal Access. If you have not already done so you will need to enter information for your desired notification methods.
Enter the email address(es) and text number(s) that you would like to use for partner request notifications. The recipients will receive notifications alerting them when a partner has added or edited a request via their partner portal. Separate multiple recipients with a comma. You may use the "Test A Phone Number" link to enter a phone number and verify that it is a valid number capable of receiving text messages.
Below the Notification Maintenance section there will be a panel for each of your Associated Facilities you have designated as a Partner.
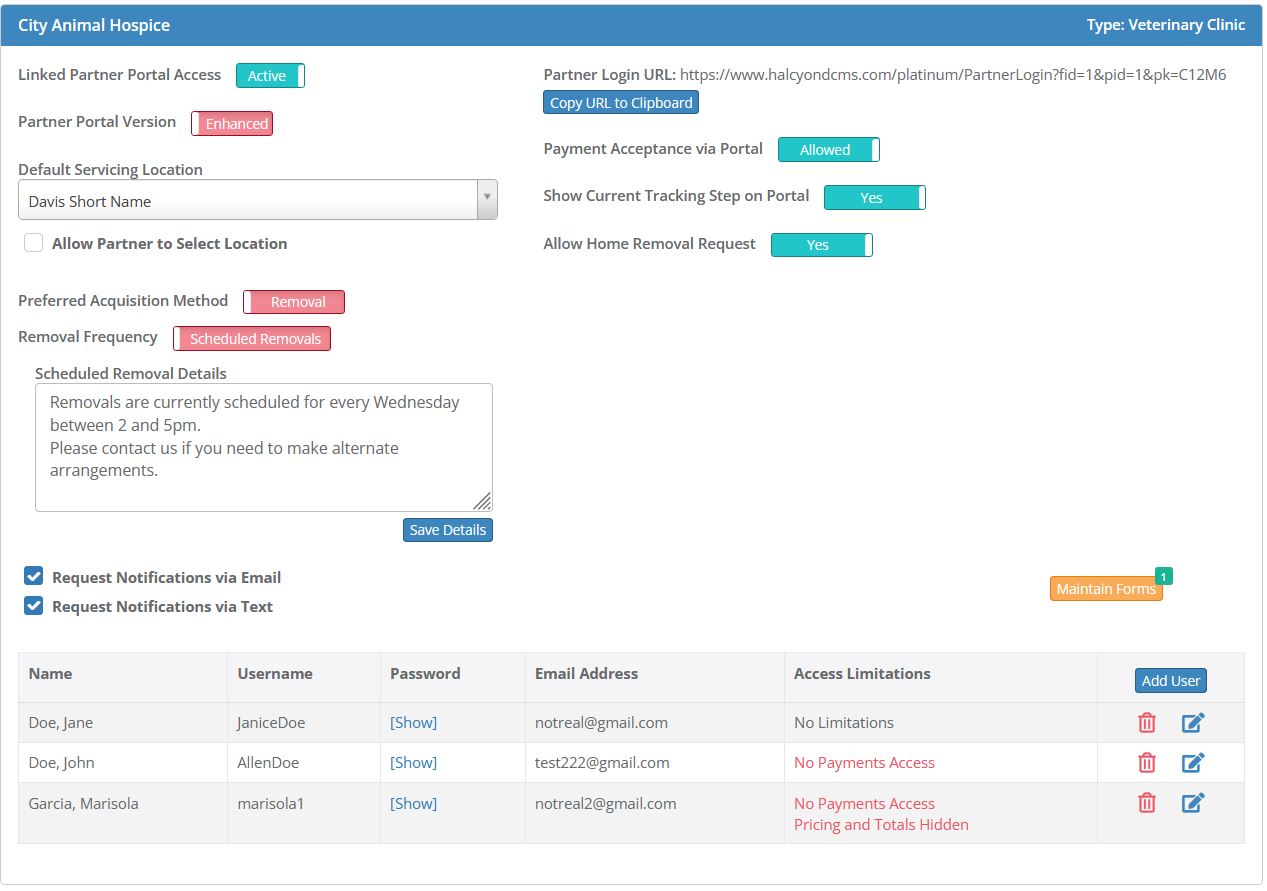
Partner Login URL: This is the partner's unique web address that you will provide to them.
User Access: You control the usernames and passwords for each partner. You may add, edit or delete users. Your partners will only be able to change their passwords and they must contact you to add or remove logins.
If you have allowed the Enhanced Portal access for a partner you will have the ability to limit access for each user.
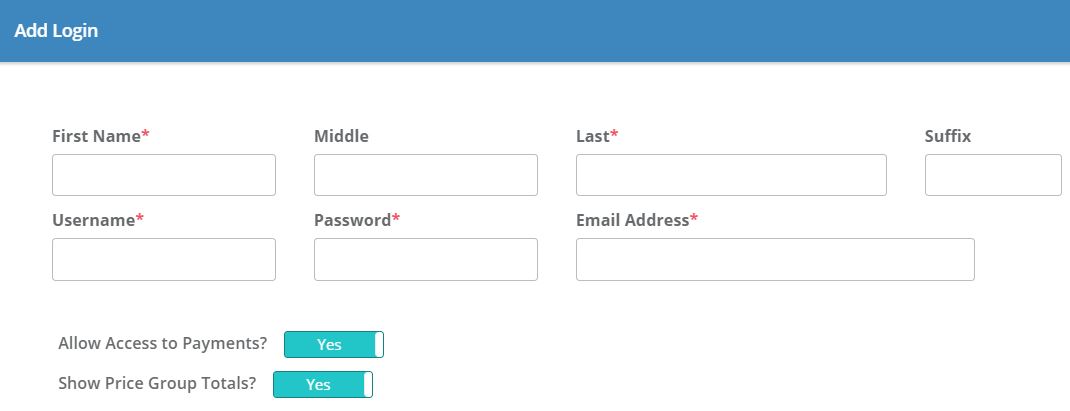
There are three possible access levels: No Limitations, No Payments Access and Purchase Totals Hidden.
If the toggles for "Allow Access to Payments?" and "Show Price Group Totals?" are both set to Yes the user will have full access (No Limitations) to all features of the portal.
Set the "Allow Access to Payments?" to No if you do not want the user to have access to payment information. If set to No, the user will not see the menu options for "Open Accounts" and "Payment History". In addition, the menu option for Case Search will not show any payment information.
Set the "Show Price Group Totals?" to No if you do not want the user to see the Price Group totals. The user will be able to select a price group and see the items that are part of the price group but they will not be shown the dollar amount. Note that if you have configured a price group to include the option to add additional items, the pricing and total for the additionally selected items WILL appear but the user will not be shown the grand total of the price group base price, additionally selected items and taxes.
Linked Partner Portal Access: This toggle allows you to disable all logins for this partner. If disabled your partner will see a notice that their access is currently disabled when they attempt to log in.
Partner Portal Version: You can control if this partner has access to the Basic or Enhanced version of the Partner Portal. The Enhanced version of the portal allows your partners to see more information about current and past requests, to make additional purchases based on how you have setup your price groups for that partner, and to make payments if you have payment processing enabled. View the help article for the Basic Portal version for more information. It is possible to allow some of your partners to use the Basic Portal Version and others to use the Enhanced Version.
Default Servicing Location: You will only see this setting if you have multiple servicing branches. (This configuration option is controlled by Halcyon at your request.) This allows you to define a specific branch for this partner. You can check the box for "Allow Partner to Select Location" if you want to allow your partner to select the servicing branch when they add their request.
Preferred Acquisition Method: This will pre-check the acquisition method for the partner's request. The partner will be able to change that method if you have made the field available on their Request Add/Edit screen. Details about Partner Request Field Setup is discussed later in this document.
Removal Frequency: You may choose either "Scheduled Removals" or "As Notified". If you choose Scheduled Removal you may enter schedule information which will appear on your Partner's Portal.
Request Notification Methods: You may choose the notification methods you would like for this partner. The email address(es) and/or text number(s) used will the information you have entered into the Maintain Notification Addresses at the top of the page. Note that you will NOT receive request notifications for partners that are configured for Scheduled Removals.
Payment Acceptance Via Portal: If you are integrated with our payment processor you may choose to allow your clinics to make payments via their portal.
Show Current Tracking Step on Portal: If enabled your partners will see the current tracking step for each pet on their dashboard.
Allow Home Removal Request (Pets Only): If set to "Yes" your partners will have the option to select either Removal from their clinic or removal from the Pet Owner's Home when they make a request from their portal. If this toggle is set to "No" they will not have the option to select a removal from the Pet Owner's Home and all Removal Requests will be assumed to be from their facility.
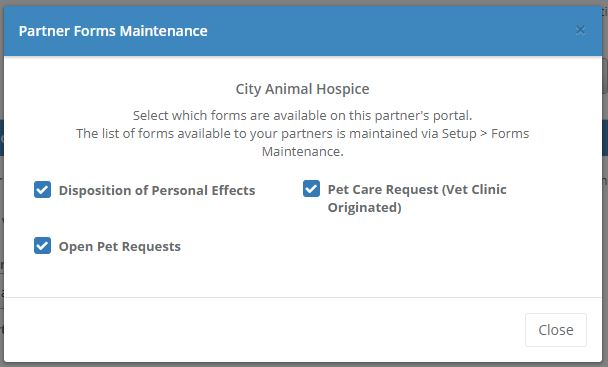
Maintain Forms: The number at the top right of the orange Maintain Forms button shows how many forms you have made available to this Partner on their Portal Dashboard.
Partner Forms Availability
In order for a form to be available for ANY Partner you must first allow access via Setup > Maintain Forms and Visibility. Check the box in the Partner Portal column for each form you would like to potentially make available to one or more partners.

When you click the orange "Maintain Forms" button for a specific partner you will be presented with a list of all the forms you have previously made available via Maintain Forms and Visibility. Check off the forms you would like this particular partner to have access to via their Dashboard. You can view the Partner's Help Document to see how the available forms will appear on their Dashboard.
Partner Data Field Setup
To control which data entry fields appear on your Partner's Case Add/Edit screens visit the Field Setup links under Associated Facilities and Partner Portal Maintenance on the Admin menu. Click the Visibility toggle to green to show a field. Check the Required? checkbox to set a field as required.
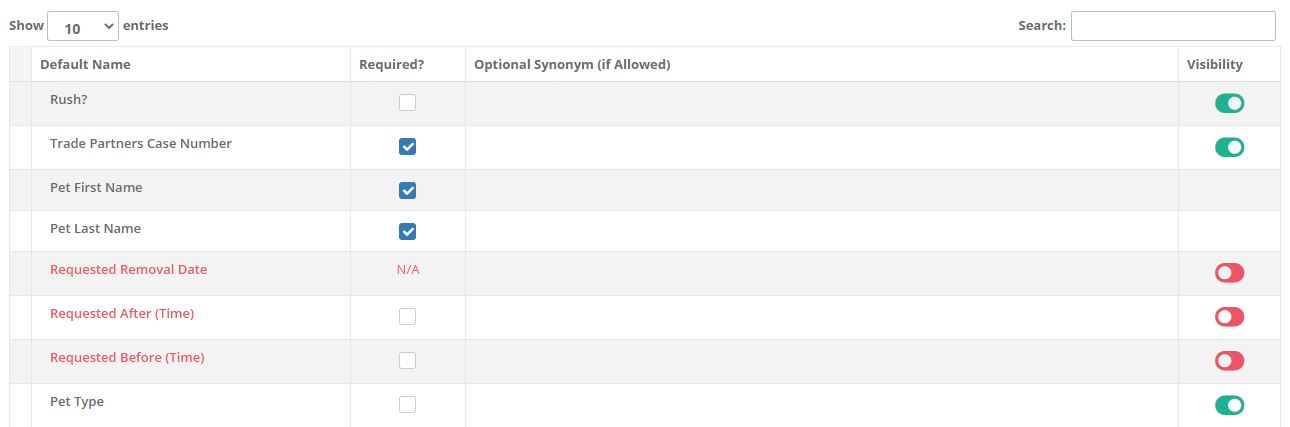
You can view the Partner's Help Document to see how their request entry screen will appear.
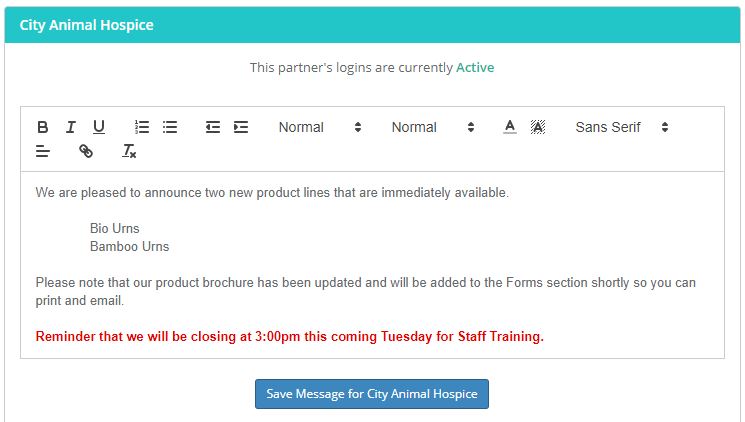
Partner Messages
You can add messages via Partners via Admin > Associated Facilities Maintenance > Partner Portal > Partner Portal Messages. The messages will appear on the Partner's Dashboard. You can view the Partner's Help Document to see how the message will appear on their Dashboard.
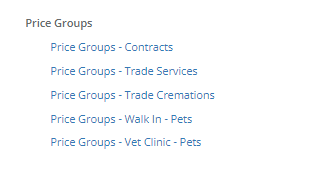
Price Groups
Price Groups are maintained under Admin >Financial Maintenance > Price Groups. The price groups that may be made available to your partners have the word "Trade" in the link. For example: Price Group Maintenance - Pets Trade or Price Group Maintenance - Trade Cremations.
Each price group you have created will be listed. The top of each panel will show which portal version you have defined for that partner - Basic or Enhanced.
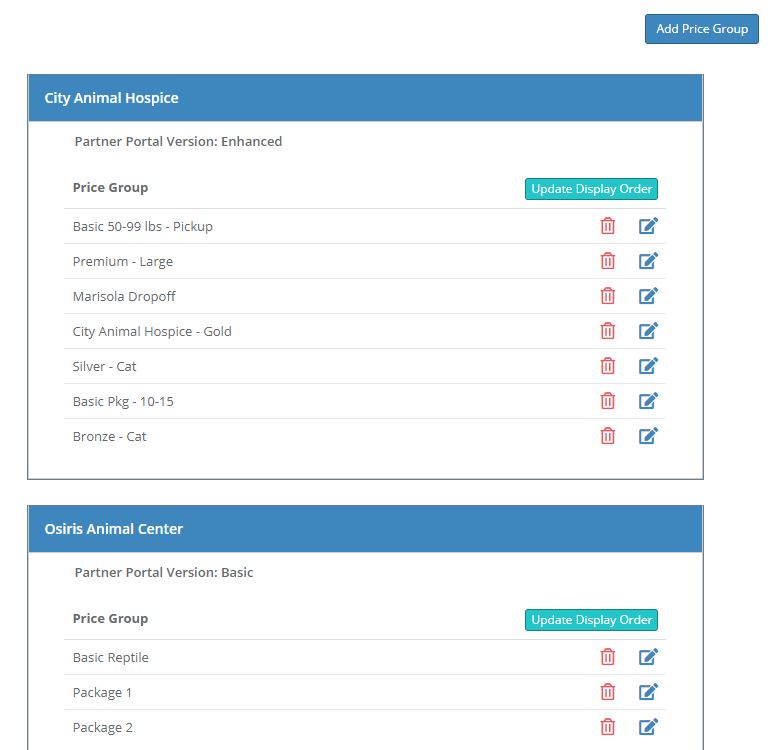
The enhanced version allows for you to add additional optional services and merchandise to Price Group. When your partner selects the Price Group they will be able purchase the additional services that you have allowed.
See the help article covering how to create Price Groups for more details.
When you accept the request via your Partner Request Widget on your Dashboard, the case information, purchases and forms will be added in the new Case record.
Comments
0 comments
Article is closed for comments.