There are 3 ways to create an obituary. 1) Fully manual entry, 2) Created from one of your pre-defined templates or 3) Generated from ChatGPT AI.
Manual Entry:
Fully Manual entry: Click the Manual Entry button and begin typing in your obituary. It is possible to copy the text from another document editor and paste in the obituary text.
If you create the Obituary in an editor such as Microsoft Word and plan to cut and paste into Halcyon be sure to use a "basic" font like Times Roman; otherwise, some characters may not appear correctly when emailed or printed. For example what looks like a single quote may appear as something like â€. This is due to the internal representation of that character in that particular font and is not something Halcyon has control over.
Created from a Template
You may create a draft of your obituary by selecting one of your pre-defined templates or you may type in the obituary “from scratch”. After you initially save the obituary, you will also have options to print a copy of the obituary, add a photo, and/or email this obituary to publishers.
Fields with missing information will appear with double percentage signs on either side of them. You will be alerted as to which fields could not fill due to missing data if you save an obituary with missing information. You are still able to type in the text box if you are using an obituary template.
Please see the Obituary Template Maintenance help article for more detailed information on maintaining your obituary templates.
Created from ChatGPT AI
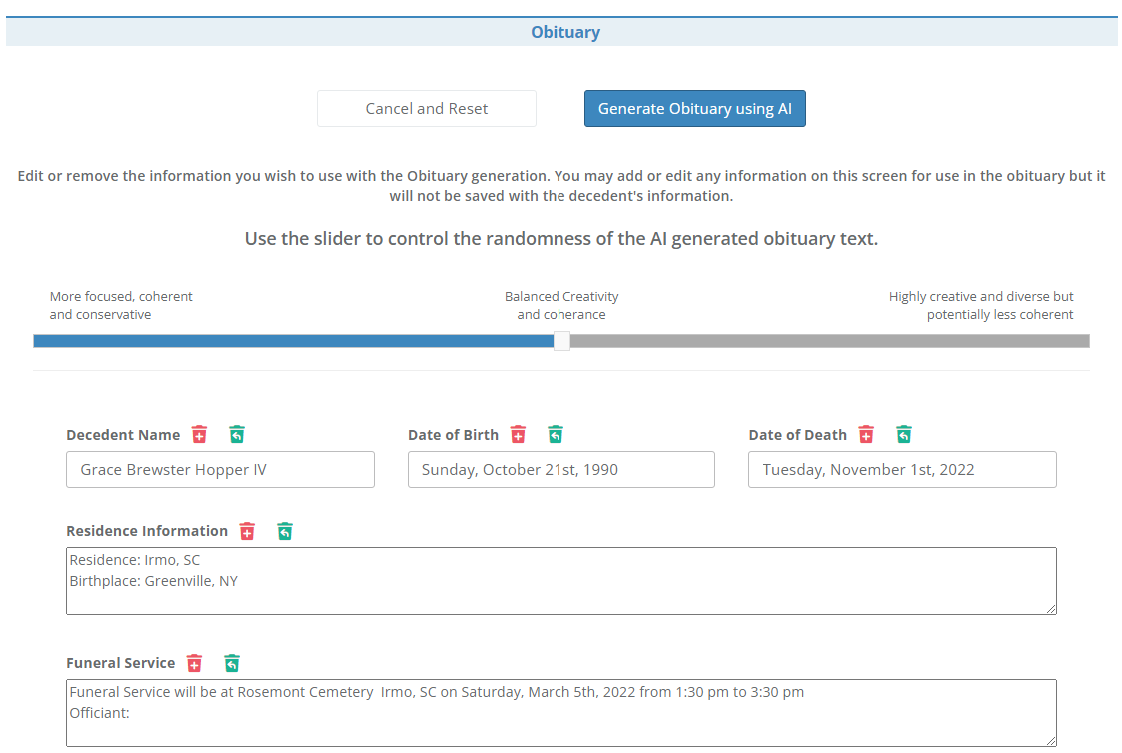
When you select "Create with AI" you will be presented with input fields containing the decedent's information created from the information currently saved with their case. For clarity we will call this the "initially loaded information". You may modify this information how ever you wish prior to sending to ChatGPT AI.
Clicking a red trash can icon next to a field name will clear out the information in that field. Clicking the green icon will restore the initially loaded information. Note this will not restore any data you may have changed after the page initially loaded. If you do not see a green restore icon that means that there was no initial information for that particular field so there is nothing to restore.
At the top of the screen there is a slider control that may be used to adjust the randomness of the generated obituary text. You may set the scale towards more creative but this also introduces the possibility for some random, incorrect, information. Feel free to experiment with different settings.
Simply click the "Generate Obituary using AI" when you have all of the information entered and are ready to create your obituary draft. Please be patient while the draft is being generated. The full obituary draft will appear in the obituary editing area. Modify the obituary as necessary and don't forget to save.
ChatGPT AI is a really helpful tool but it is critical that you carefully review the automatically generated obituary draft for accuracy!
Photo Maintenance
You may optionally upload an obituary photo. This photo will appear on the Overview page and can also be included in Obituaries you email to publishers that you have added. (Please see the article on Obituary Publishers for more information.)
To add, change or remove a photo, click the Photo Maintenance button. You will be presented with a screen that will allow you to select a photo from your local computer.
When you click the Save This Photo button, a virus scan will be performed on the file and it will be uploaded to the server and a thumbnail of the photo will appear on the screen. If you have a photo uploaded and later click the Photo Maintenance button you will see the option to Delete the Saved Photo which will delete it from the client record. If you wish to replace the photo you can click the Select A Photo button, select a new photo from your local computer and Save the Photo.
Photo Orientation
The system does not rotate images during the upload process. If you notice that your photo appears rotated or flipped after uploading it, that means your original photo is rotated (though your computer may auto-rotate it to adjust when you are viewing it in some applications).
You can edit and rotate the image using an image editor like Microsoft Paint and then re-upload and it should appear correctly.
Email Obituary
You may email the obituary to publishers you have previously entered via Obituary Publishers maintenance by checking off the checkbox(es) next to the publisher. You may add additional email addresses by separating them with a comma. You can also manually add "one off" recepients by clicking the " - Manual Entry -" option in the Include additional recipient dropdown. This can include other publishers or family members.
There is a box to enter additional information which is included in the body of the email. You can also include the obituary photo as an attachment to the email. Make sure to select an employee that should receive any replies sent for this obituary.
There will be a table at the bottom of the screen that will contain the list of times the email was send, which username sent the email, the addresses the obituary was sent to, any notes included in the email and if a photo was included or now.
Print Saved Obituary
This option will open up a new tab in your browser containing the currently saved obituary. You may print a copy to give to the family. Some funeral homes ask the the family sign a hard copy of the email prior to it being sent to obituary publishers which you could then upload via the client files tab .
Comments
0 comments
Please sign in to leave a comment.